Monday 8 November 2021

It's all in the detail


No major projects to report on for this entry, but lots of little jobs here and there that are moving the layout forward slowly towards completion (if that is ever possible).

First off, lots of telegraph poles and power poles. Seven telegraph poles where only two pairs are identical. Based on Ratio items, chopped about to provide the correct number of arms and 'pots', plus some 0.2mm diameter wire for two 'stays' where the wire course changes direction to cross the tracks.It took a lot of pouring over fuzzy photos to triangulate the positions of the poles, and identify the number of arms and 'pots' on each. 


This last photo also shows a power line pole. The power lines disappear off in the direction of Yarmouth. This pole is made from 2mm diameter brass rod, with brass angle and wire additions and some 3D printed insulators I found on Shapeways.

The main power pole on the front of the layout includes a 3D printed transformer from N Brass Models.


Next is a rail built buffer stop for the end loading bay, based on drawings and photos in the newest edition of 'Southern Nouveau'.


Finally, building the many coal staithes along the front of the layout has started. There appear to have been three distinct areas, with separate entrances from the road, but I only know of two coal merchants operating there.

The staithes are built up from plasticard and cut up matches, with real coal on top of black foam formers. The coal scales are lovely 3D prints from Modellbahn Union. Figures from Hardies Hobies with etched shovels attached, as they would not print at this scale.


You may notice that the rolling stock is all now the types of wagons that actually appeared on the island. Largely ex-LBSCR 5 plank wagons, ex-LSWR 7 plank wagons and ex-LBSCR 8 ton vans. There is also an ex-LBSCR Road Van, ex-LBSCR Road Truck and a Royal Daylight paraffin tanker. Still more to be built though.


Sunday 18 April 2021

Three Wheels On My Wagon

Having used my imagination to create a non-descript building supplies/scrap dealership at the far end of Freshwater goods yard that I have not found photographs of, I decided the business needed a better means of transporting its wares than the old bicycle. I purchased an Autocraft white metal casting for a 1930's Reliant three wheeled van. 

This is a nice casting, but there are a couple of omissions. First, there is no interior detail, or floor. Second, are the wheels. Representing spokes in this scale is obviously not practical and the etched bicycles I use do not have them either, which is fine. However, in photos of real Reliants of this period, the ends of the rear axle, and in particular the brake drums, are plainly visible, and needed to be added. 


So, I cut out a floor from a piece of spare brass etch surround and added a chassis using the staples from the Autocraft packaging (waste not want not). A length of brass rod formed the axle and a couple of etched con rod washers were just right for the brake drums. A lump of plastic formed to represent the engine cover was glued inside the body, and another piece of plastic was glued inside the back doors for the floor to sit against. Getting the right position for the axles to sit centrally in the rear wheels took a bit of care. 


Above the floor, I added a representation of the driver's seat, and a steering wheel, using a small etched wheel from N Brass. A 12BA bolt was soldered into a hole drilled in the floor. This will be used to glue the vehicle to the layout.

Now it was ready for painting. The layout is very green at the moment, so I wanted to add a splash of colour. It may not be a prototypical colour, but I went for yellow. The roof and mudguards seem to be always painted black on these. I printed my own transfers, which is simple for black lettering on transparent film. Before wetting them, I varnished them using Johnsons/Pledge Multi-Surface Polish (used to be called Kleer) which is actually a cheap way of buying acrylic varnish. This protects the printing while applying the transfers.

The windscreen was cut from a tray that had held some bakewell tarts. The 'cups' are used for mixing and thinning paint. Fitting the windscreen, fixed with Kristal Klear cockpit glue, took some patience. Fortunately, the side windows are not glazed.

I added an etched roof rack from FKS Modellbau, and a suitcase from bits of plastic, and Totland Independent Trading Co was born. 


 Any similarity between this model and any other yellow three wheeler van is, of course, entirely coincidental. 😎


Thursday 25 March 2021

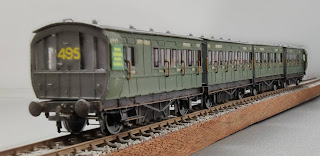
Stroudley 4 Wheelers for Freshwater


Two sets of 30 year old ex-LBSCR 4 car 4 wheeled carriages arrived on the Isle of Wight in 1924. They were followed later by some slightly newer Billington carriages, some of which still run on the Isle of Wight Steam Railway. The Stroudley sets saw less than 10 years service on the island, so are not really suitable for the period of my layout. But a set of etched brass bodies are available from Etched Pixels, so how could I resist.

 Being only body kits, I needed some chassis that were more suitable than chopped up N gauge Peco offerings. After a chat with David Eveleigh it seemed his etched nickel silver 4 wheel chassis for GWR carriages would be the most suitable. I would need some suitable overlays for the solebars to give the Stroudley appearance, and some buffer beams. So started my first and only attempt at designing my own etches. I needed to etch some window frames for the signal box and magazine stand for Freshwater, so a design was drawn up, and luckily, produced a sheet that was fit for purpose, albeit with plenty of spares - just in case.


Construction started in early 2018. 0.3mm holes were drilled for the handrails and doorknobs while the etches were still flat. A pillar mini-drill was used for this. The bodies were then folded up and the corners held with a fillet of solder. The guard's lookouts were a little more fiddly, but achievable. The etches also went together well, and with my solebars added started to look the part. 

Handrails were bent up from fine hard brass wire and soldered in the pre-drilled holes. Ultima door handles were also fitted.


Buffer beams with buffers and battery boxes were designed in Blender and printed by Shapeways. The ends have quite large buffers, while the intermediate ones within the set are quite small for close coupling. The components were primed with rattle-can sprays ready for final spray in Southern olive green. 


 Next came the transfers. The correct numbers were formed from individual digits, and were both ends as well as both sides. With all the repeated digits in the actual coach numbers, I needed two sets of transfers from Fox to complete. It took several evenings as I could only concentrate for so long, maybe two coach sides at a sitting. 


 Some glazing and interior detail was next on the list of jobs. I used UV cure glue to fix the glazing. I found images of the old Peco/Kitmaster card coach interiors on the Internet, so I adjust the size and printed off a couple of sheets, and chopped them up to fit. A few seated figure from China (eBay) were added. 

The bodies were glued to the chassis, and the roofs (with Ultima vents fitted) were glued on top and they were ready to roll.